

Global#
Settings#
The settings in this page allow to configure system notifications, domain disclaimers, and how users can search for other users.
To configure notifications, provide the e-mail address that appears as the sender of the system notifications, which must be unique, and the recipients that will receive them.
The first options is to activate the domain disclaimer as a mandatory option for all domains configured. By default, the disclaimer, whose text can be configured in Section (see Disclaimer), is added at the end of each incoming and outgoing message (i.e., messages with a recipient external to the domain), unless the second option, Only allow outbound disclaimers, is enabled: in that case, the disclaimer is added only to outgoing messages
See also
Domain disclaimer can be managed from the CLI as well, please refer to Section Configuring Domain Disclaimer.
Once you change any of the options, restart amavis as the zextras
user on every Node featuring the MTA Component.
zextras$ zmamavisdctl restart && zmconfigdctl restart
The switch labelled Allow searching users’ information in all domains, when active, allows any user to search for other users in all other domains configured on the Carbonio infrastructure.
For example: user John with e-mail address john@example.com will be able to find user Jane jane@acme.example (which is on a different domain) only if this switch is active, otherwise Jane will not show up in the results.
If the option is not active, it will be possible to define in each domain, (See General Settings) one or more of the other domains from which to search users of other domains.
Limitations
This settings is available to Global Administrators only and currently for searches within the Chats module.
Administrators#
This page is an excerpts of the Accounts () table, showing all the Global Delegates.
White-label Settings#
Global settings concern the appearance of Carbonio and allow to customise various option that will influence how the Carbonio web interface appears to the web clients.
Note
These setting are applied to all the domains configured; if you want to customise the appearance of a single domain, please change the settings under .
The description of the available options can be found in the dedicated section.
Domains#
This table lists all the domains configured on Carbonio. A click on any domain opens the General settings () of that domain. Check section Create New Domain to add a new domain.
2-Factor-Autenthication#
In this page it is possible to configure 2FA globally (i.e., for all domains configured) for the various services offered by Carbonio. To modify settings for a single domain, refer to 2-Factor-Authentication.
Note
The global values configured are inherited by all domains, but they can be overridden by domain-specific settings.
2FA limitations
These are the main limitations for adding 2FA to the login procedure.
2FA applies only to those protocols or apps supporting it, for example HTTP and HTTPS but not to IMAP, POP and SMTP
The Carbonio Admin Panel does not support second authentication factor and will stop working once 2FA is activated, except for Trusted Network scenario (described later) or Service Credentials (see section Service Credential Management)
Selecting Trust the Device implies that users must use the same browser, otherwise they will be required to log in again: if a 2FA login is carried out on Chrome, accessing the same page with Firefox will fail. More on this in the dedicated box below.
There are 3 main application scenarios for 2FA:
In the default scenario, the second authentication factor is not required. This implies that users can access Carbonio with their own username and password, from any IP, via all supported protocols.
This implies that to access Carbonio, users must provide their own username, password, and the second factor (OTP) from any IP, via all supported protocols. Trying to access with an unsupported protocol results in an automatic failure.
To deploy this scenario, configure the options as follows:
In the What to trust? field, select either Trust the IP or Trust the Device
Leave the Trusted Networks (IP ranges) field empty
Click APPLY TO ALL SERVICES, then save.
In this case, depending from where the users connect, different mechanisms apply. If they connect from outside the trusted networks, they need username, password, and the second factor (OTP). If they are initiating the connection from a trusted network, it depends on which alternative you choose to configure the options:
Trusted Networks for all protocols
In the What to trust? field, select either Trust the IP or Trust the Device
-
Enter the subnet to trust in the Trusted Networks (IP ranges) field, for example
172.24.0.0/24. You can add multiple, comma-separated subnets.Hint
Single IP addresses can be trusted using the
/32suffix, e.g.,192.168.1.1/32. Click APPLY TO ALL SERVICES, then save.
To login, users within the trusted subnet do not require 2FA.
Trusted Networks for a specific protocol
In the What to trust? field, select either Trust the IP or Trust the Device
-
Enter the subnet to trust in the Trusted Networks (IP ranges) field, for example
172.24.0.0/24. You can add multiple, comma-separated subnets.Hint
Single IP addresses can be trusted using the
/32suffix, e.g.,192.168.1.1/32. For each protocol or a specific one, select whether to trust an IP or device, then enter an IP range.
There are slight differences between the two options.
With the Trust the IP option active, once a user authenticates using the second factor, the current user IP is temporary added to the user’s trusted networks, from any of the supported protocol. Hence, they do not have to enter the second factor for other authentications: for example, we want to give users the possibility to trust their home address at the first login.
- What happens at login
-
At the first attempt, users must log in with their username, password, and OTP. They can check “Trust this device and IP address” to mark their own network address as trusted. All future requests coming from that IP will be considered valid and will not need the second authentication factor. Once the grant period is over, it will be necessary to log in again (to webmail or from a mobile app) by entering the second factor.
- Services/Protocols
-
All services used by the IP will be considered trusted, including services that do not support 2FA, for the duration of the trust period.
Important note on Trusted IP
With the Trust the IP policy, even services and protocols that don’t support 2FA could become accessible outside the trusted network.
For example, an admin that wants to allow SMTP and IMAP from the user’s home IP can configure that domain to allow the user to
authenticate to the WebMail using the OTP
add the home IP to the trust IPs
use the SMTP or the IMAP from a trusted connection
once the trust expires, the user must re-authenticate with the WebClient
With the Trust the Device option, once the user authenticates using 2FA from any of the supported protocols, the current device (browser or mobile device) is temporarily added to the user’s trusted devices. This allows the user to skip the second authentication factor for subsequent logins from the same device until the trust period expires (e.g., enabling users to trust their browser session or mobile phone after the first login).
- What happens at login
-
At the first attempt, users must log in with their username, password, and OTP. They can check “Trust this device and IP address” to mark their own trusted device. All requests coming from that browser session or mobile device will be considered trusted and will not need the second authentication factor. Once the grant period is over, it will be necessary to log in again (to webmail or from a mobile app) by entering the second factor.
Quarantine#
In this page appears the configuration of the special quarantine e-mail account, which holds all the messages either marked as Spam or containing viruses.
The available setting is the duration of the retention time, i.e., how long these messages are kept before being deleted forever. The quarantine account, including all the e-mail messages it contains, can be deleted and recreated by clicking the DELETE AND RE-CREATE button. At the bottom of the page the list of quarantined messages is shown. Being a system account, to view the messages you can go to , click the quarantine account, then the VIEW MAIL button to see the quarantined e-mails.
When viewing a quarantined message, the Administrator can carry out a few actions on it:
View the original message, including the score and the reason why the e-mail was marked as spam
-
Remove infected attachments from the e-mail and deliver the e-mail to the recipient (see box below).
Note
If the e-mail still has infected attachments, it will not be delivered.
Download the message and share it with the recipient
Delete the e-mail
To remove one or more attachments from an infected e–mail, hover on the name of the attachment and click the thrash bin icon
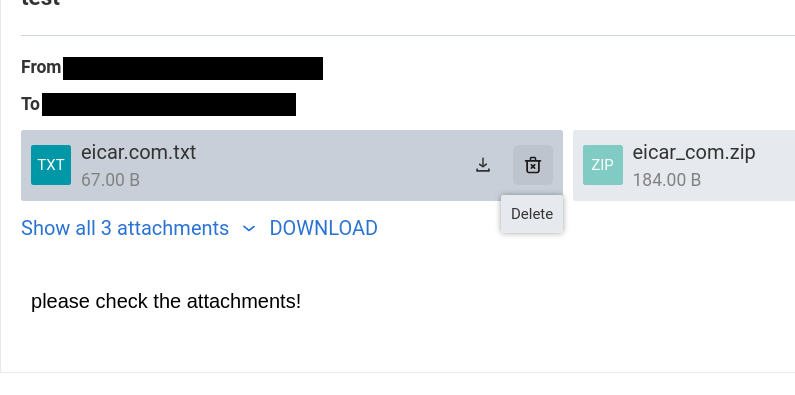
Once all the infected attachments have been removed, click the DELIVER button to complete the delivery of the e-mail to the intended recipient.
ActiveSync#
This page allows to configure the DoS protection. The Maximum of Requests Allowed and Time window for Allowed Requests options define how many attempts a Mobile device can carry out in the given amount of time: when this happens, the device is jailed (i.e., it will not be allowed to connect) for the amount of time defined in the Jail Duration.
The buttons allow to restart the jail, freeing all blocked devices and allow them to connect, and purge the ActiveSync status.
Mobile includes a dedicated DOS Filter component to improve both security and stability. The DoS filter will automatically activate whenever a device exceeds the defined connection rate over time and will forbid any connections from that device for a given period of time.
This approach improves both security, by helping to prevent DoS attacks, and stability, by blocking clients that are performing too many requests because of bugs or malfunctioning, thus saving resources for all other clients.
When the rate has been exceeded, a warning is sent via email to admin and added to server notifications.
See also
You can configure the DoS Filter from the CLI: please refer to Section Carbonio Mobile DoS Filter Configuration.