
Single-Server Installation with Ansible#
Architecture#
The architecture of this scenario is depicted in the following diagram.
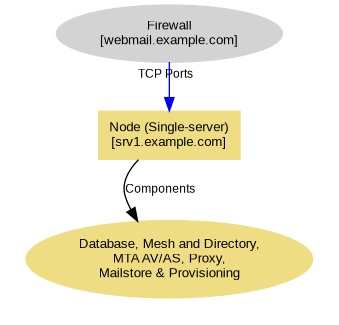
Fig. 3 Sample diagram of the Single Server Node installed using Ansible.#
The scenario involves a single server node providing essential functions:
Mail
Calendar
Contacts
Backup
If your use case requires other collaboration tools or video capabilities, the single-server installation can be extended by adding:
Preview/Files - on the same Node
Tasks/Docs/Chats - on a second Node
Videoserver/Videorecording - on a third Node
Depending on the features chosen, the architecture changes and can be seen in the following diagram.
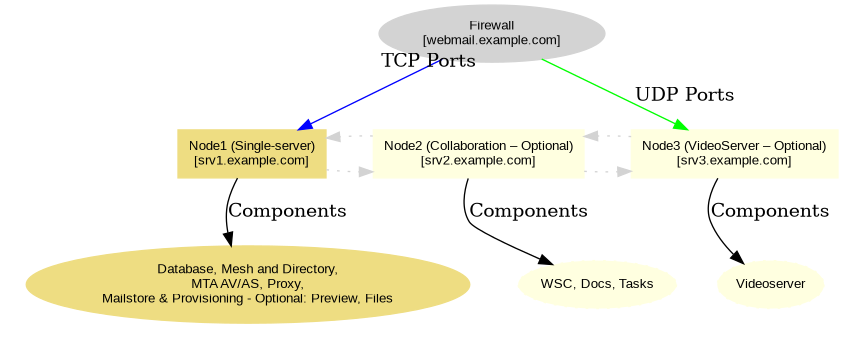
Fig. 4 Sample diagram of the optional Collaboration and Video Server Nodes within the Single Server scenario.#
Requirements#
Hardware Requirements for the Single Node are more demanding compared to each single Node in a Carbonio Multi-Node setup.
Single-Server Node
8 vCPU
24 GB memory
100 GB disk space for the OS
Additional disk space for the users’s e-mail storage, taking into account the expected e-mail volume, quota, and retention policies. This storage must be mounted under
/opt/zextras
Optional Collaboration Node
4 vCPU
16 GB memory
50 GB disk space for the operating system
Optional Video Server Node
8 vCPU
8 GB memory
50 GB disk space
If you plan to record video meetings, you need to allocate sufficient space to store temporary files on this Node
Installation#
This Single Node scenario can be installed using Ansible: you need to
setup a control node to run Ansible playbooks (please refer to section
Prepare the Ansible Environment, then follow the directions on setting up
the control node). To access the control node, execute the following
command to log in (replace mail.example.com with the name or IP of
the control node)
$ ssh root@mail.example.com
$ ssh -A root@mail.example.com
After you have logged in to the control node, download the Ansible inventory (see below this paragraph), replace the FQDN and values present in the file according to your planned Carbonio infrastructure.
Inventory - “Single-Server” Scenario
[postgresServers]
srv1.example.com

[masterDirectoryServers]
srv1.example.com

[serviceDiscoverServers]
srv1.example.com


[mtaServers]
srv1.example.com

[proxyServers]
srv1.example.com

[proxyServers:vars]
webmailHostname=srv1.example.com

[applicationServers]
srv1.example.com

############ Optional Components ############

[previewServers]
srv1.example.com

[filesServers]
srv1.example.com

############ Optional Components - to be installed on a different VM ############
[taskServers]
#srv2.example.com

[docsServers]
#srv2.example.com

[videoServers]
#srv3.example.com public_ip_address=x.y.z.t

[workStreamServers]
#srv2.example.com

############ These Components are not supported in Single-Server scenario ###########
############ They are required for the proper Ansible installation #############

[dbsConnectorServers]
#Only for HA infrastructure from 24.12.0. Don't fill it out

[replicaDirectoryServers]

[prometheusServers]

[syslogServer]
Note
To add any of the Components listed as optional, simply remove the comment (#) indicating the correct name of the server on which to install the Component, based on the directions provided.
Once you edited the inventory, save it in a directory of your choice
as carbonio-inventory-single. Now, you can run the script:
from that directory execute the command
$ ansible-playbook zxbot.carbonio_ssinstall.carbonio_ssinstall \
-u root -i carbonio-inventory-single \
--extra-vars "install_path=zxbot.carbonio_install.carbonio_install"
Antivirus Engine#
The antivirus engine (ClamAV) is automatically installed by Ansible
and is part of the installation procedure. If you already have a
company-wide antivirus engine, you can disable the one installed by
Carbonio, together with other components by issuing as the
zextras user the following command:
zextras$ carbonio prov ms $(zmhostname) \
-zimbraServiceEnabled amavis \
-zimbraServiceEnabled antivirus \
-zimbraServiceEnabled antispam \
-zimbraServiceEnabled opendkim \
carbonioAmavisDisableVirusCheck TRUE
To entirely disable ClamAV or carry out other management options, like modify signature lists or installing a signatures updater, please refer to Section Antivirus & Antispam Management.